
Experiment 1 - The "Initial" Stamp
The PDMS stamp can be used to transfer many small complex patterns. This experiment
may be used to learn about the general idea of the stamp fabrication process
and properties.
Materials
- Dull pencil
- Aluminum foil
- Glass slide
- Convection oven capable of reaching 130º C
- Sylgard Elastomer 184, obtained from Ellsworth
Adhesive Systems
- Thick-walled tube mold (~ 1 cm I.D. x ~ 3 cm long). A recommended mold is
a standard taper 24/40-to-10 Pyrex adapter.
- Ink pad or markers
Procedures
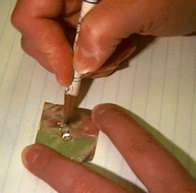
- Take a smooth piece of aluminum foil and place it on a somewhat soft surface
like a stack of paper. Using a dull pencil or a ball-point pen, print letters
such as your initials onto the foil surface, Figure 1. Deeper letter
imprints make better stamps, but DO NOT open holes in the foil with the writing
instrument. It may take some practice to obtain uniformly deep lettering.

Figure 1. Impressing initials into aluminum foil.
- Place the foil onto a solid, heat-resistant flat surface such as a glass
slide and carefully place the glass tube over the foil. Be careful not to
flatten the engraved lettering with the mold while it is being positioned.
A recommended mold is a standard taper 24/40-to-10 Pyrex adapter, Figure 2.

Figure 2. Recommended mold for making the "initial" PDMS
stamp.
- Pour the freshly mixed PDMS (~1:10 ratio of curing agent to base) into the
mold to a depth of approximately 1 cm (typically 1 g will be sufficient for
the mold previously mentioned) and set aside for 15 minutes to reduce the
amount of bubbles and PDMS clinging to the sides of the mold. After curing
at 130º C for 30 minutes and cooling, slowly peel the foil away from
the PDMS and mold. Then carefully remove the PDMS from the mold by pressing
on the PDMS at a point where it meets the inside mold walls on the end opposite
the lettering. Repeat this process while moving around the inside wall until
the PDMS pops free of the mold. Excess cured elastomer may be removed carefully
with a razor blade.
Explorations
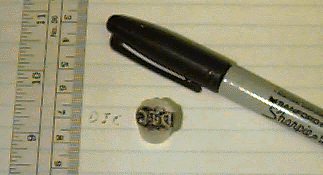
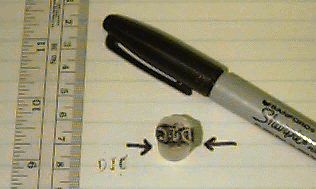
The stamp may be inked by an ink pad or even by markers, Figure 3. Try squeezing
the stamp during ink transfer to paper and observe what happens to the size
and shape of the letters, Figure 4.

Figure 3. Print from "initial" stamp inked with permanent
marker. The length of the "J" (the middle letter of DJC) in the
printed image is four millimeters.

Figure 4. Compressing the "initial" PDMS stamp (direction
of compression indicated by arrows). The length of the "J" in the
printed image (the middle letter of DJC) has increased to five millimeters.
Return to the PDMS Main Page
Experiment 2 - A Flexible Diffraction
Grating
Experiment 3 - Bouncing PDMS Balls
Experiment 4 - Surface Treatment of PDMS
Exploring
the Nanoworld |
MRSEC Nanostructured Interfaces
Copyright © 2006 The Board of Regents of the University
of Wisconsin System.


