
![]()
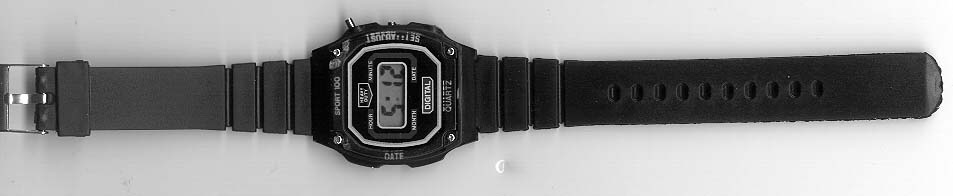
1. Disassembly of Inexpensive LCD Watch
The watch is disassembled by first removing the four tiny screws holding on
the face plate. Carefully store the screws for safe keeping (There are several
tiny parts that can be easily lost). Now carefully remove the watch from the
case (the watch is all of the material mounted on the plastic inner case). The
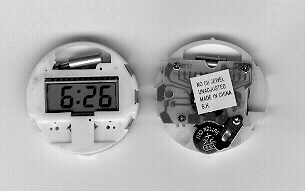
black band and outer case should be set aside. Figure 1 shows the front and
back of the inner case of the watch.
Turn the inner case so that you are looking at the back. Remove the four tiny screws holding the printed circuit board and battery retainer to the plastic inner case. CAUTION: At this point the two tiny switch contacts and the (+) and (-) battery contacts are loose and can be easily lost. Carefully store the 4 screws, 2 switch contacts, and the 2 battery contacts.
Set aside the battery and the printed circuit board containing an integrated circuit. Remove the LCD panel from the inner case by gently pressing the top of the panel from the front (the side away from where the integrated circuit was mounted) of the inner case. An electrically conducting pad connects the LCD panel to the printed circuit board. Store the rubber conducting pad with the other parts. Set the LCD panel and inner case aside for use later in the experiment.
2. Examination of the Components of the LCD Watch
Examine the printed circuit board and locate the quartz timing crystal, the
integrated circuit, and the contacts for: (1) the switches, (2) the battery,
and (3) the LCD panel. Locate on the panel: the top and bottom polarizers (thin
film on the glass plates), the LCD cell, the contact area of the panel, and
the contacts.
3. Measurement of the Voltage of the Watch Battery
Using a volt meter, measure the voltage of the battery used to power the watch.
4. Examination of the LCD Panel with a Polarizing Filter
Examine the LCD panel with a polarizer by holding the polarizer above the face
of the panel. Slowly rotate the polarizer.
5. Addressing Segments of the LCD Panel with a 9-Volt Battery
Using a 9-V battery and battery clip with leads, address various segments of
the LCD panel: hold one of the battery leads against the contact area at the
left end of the panel while rubbing the other lead along the contact area, Figure
2.
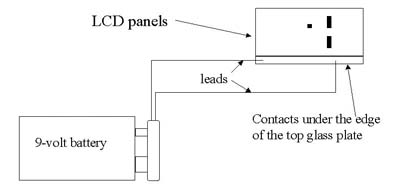
Figure 2. The various segments of a LCD panel can be addressed with
the use of a 9-V battery and the leads from the battery clip. By rubbing the
two leads against the contact area of the cell, numbers and characters can be
displayed.
6. Effect of Pressure on the LCD Panel
Under pressure liquid crystal materials, such are used in LCD watches, undergo
dramatic color changes. Press the LCD panel with your finger against a firm
surface and look carefully at the area near your finger. Now release the pressure
and observe what happens.
7. Effect of Heat on the LCD Panel
When heated sufficiently, liquid crystals can melt. Upon melting the molecules
in the liquid crystal display become disordered. In this case, the disorder
is throughout the cell and not just in certain segments aswould be the case
when a voltage is applied. Therefore, the entire region that is heated turns
black. To test this property of the LCD panel, gently grasp it with crucible
tongs and immerse it in 70-80oC water. The panel should turn black
over the entire area that was immersed. As the LCD panel cools, it should return
to its silvery appearance.
8. Determination of the Phase Transition Temperature of the LCD Panel
The temperature for the liquid crystal-to-liquid phase transition can be measured
using a hot water bath and a thermometer. Figure 3 illustrates how to set up
the apparatus for this measurement.
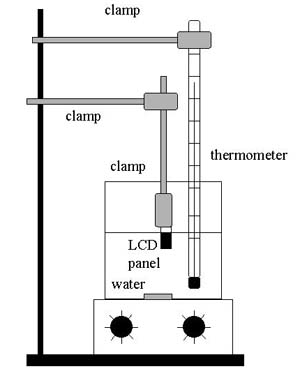
Figure 3. The set up for determining the phase transition temperature of the liquid crystal panel. Clamps or crucible tongs are used to hold the LCD panel in the water bath.
The phase transition for LCD panels normally is in the 55-75oC range. Gently grasp the LCD panel with crucible tongs and immerse about half of the LCD panel in 55-60oC water. Slowly warm the water, at a rate of not more than about 2oC per minute. At the melting point, the panel should turn black over the entire area that was immersed. Now slowly cool the bath and watch the panel return to its silver appearance.
9. Reassembly of the Watch
Begin reassembly by replacing the inner case, face down, with the round hole
for the battery toward you, Figure 4. The slots for the switches should be to
your left.
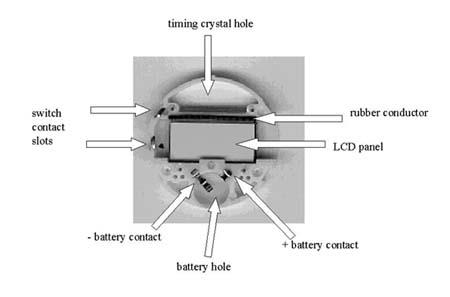
Figure 4. The inner case of the watch showing the tiny contacts.
Place the LCD panel in its slot, viewing side toward the tabletop, contact surfaces away from you. Put the rubber, conducting pad on top of the contacts of the LCD panel. Return the 2 switch contacts to their slots on the left side of the case (use the 2 upper slots). Place the longer battery contact in the left slot in the hole for the battery (it should reach near the middle). This contact connects to the bottom of the printed circuit board on the top of the inner case. The smaller battery contact goes to the right side of the battery hole. Place the printed circuit board on top, with the timing crystal in the hole away from the battery hole. Using tweezers, carefully place one of the screws in the screw hole in the upper right corner of the printed circuit board. Using a screwdriver, start the screw in its threads (do not tighten this screw yet). Place the next screw in the lower right corner, and tighten it. The next screw goes in the upper left (some of the watches will use this screw to help hold the battery retainer). This leaves the last screw and battery retainer for the lower left. If all of the screws have not started easily, try repositioning them. After you have all of the screws in their proper holes, you may tighten all of them except the one with the battery retainer. Now place the battery, with (+) side up, in the round hole and tighten the screw for the battery retainer.
Turn the case over and verify that the watch works. If it is not working, check to see that the rubber conductor is perpendicular to and in contact with the LCD panel and printed circuit board. If it is still not working, check the battery contacts for correct positioning. The smaller (+) contact RUBS on the SIDE of the battery and the (-) contact makes contact with the center of the battery. If the watch is still not working, check the battery contacts to the bottom of the printed circuit board. There should be a small area of the battery contacts over the top of the white case.
Once the watch is working, place the two buttons back through the side of the black case. The longer rod goes in the hole on the diagonal and the shorter one through the hole at the "3 o'clock" position. Carefully place the inner case in the black case, with the tab on the inner case in the slot at the top of the cavity in the black case. Now put the face plate on the case. Again start each of the 4 screws before tightening any to be sure that they are in their proper holes. Now tighten all 4 screws.
Materials
An inexpensive LCD watch; it only needs to work if you want them to reassemble
it into a working watch.
Small screwdriver
9-Volt battery and battery snap
Tongs and hot water
Thermometer
Multimeter for checking battery voltage
Check your Sunday newspaper inserts for inexpensive sources for the watches. You might even be able to get a quantity discount.
A Word document file of the experiment, Liquid Crystal: the Phase of the Future, was designed for a freshman chemistry laboratory or a freshman engineering laboratory can be downloaded.
This experiment was derived from Education Outreach, a publication of the National Science Foundation Science and Technology Center of Advanced Liquid Crystalline Optical Materials , Liquid Crystal Institute, Kent State University, Kent, Ohio, 44242 by Dr. S. M. Condren, Professor of Chemistry at Christian Brothers University, Memphis, TN, during the summer of 1994. Dr. Condren was supported by the National Science Foundation, through the NSF Summer Research Program in Solid State Chemistry.